J-channel creates clean, finished transitions around windows, doors, rooflines, soffits, and siding terminations. Learn how VSI standards, ASTM practices, manufacturer specifications, proper sizing, flashing, and expansion clearances affect J-channel installation on Bettendorf and Quad Cities homes.
Professional Vinyl Siding Installation Guidance
```Understanding J-Channel: An Important Detail in a Professional Siding Installation
J-channel may be one of the less noticeable parts of a completed vinyl siding project, but it has an important job. This siding accessory creates a finished receiving pocket around windows, doors, soffits, rooflines, and other locations where siding panels must be cut and terminated.
```When the correct J-channel is selected and installed properly, it helps produce clean transitions while leaving enough room for the siding panels to expand and contract. It must also be coordinated with the flashing and water-resistive barrier behind the siding so incidental moisture can move toward the exterior.
```For homeowners and contractors in Bettendorf, Iowa, and throughout the Quad Cities, understanding how J-channel works can make it easier to recognize the difference between a carefully planned siding system and an installation that simply covers the wall.
```What Is J-Channel?
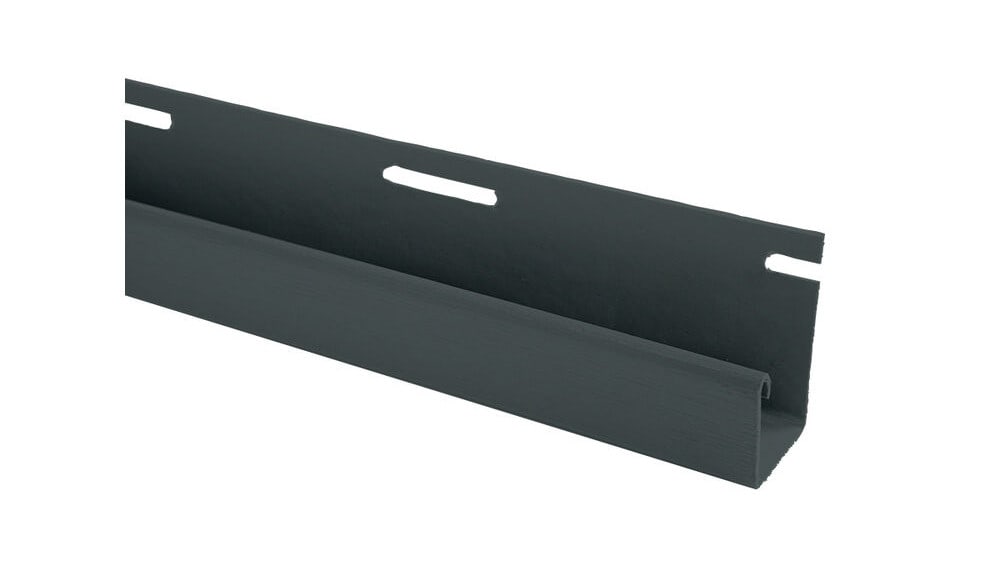
```J-channel is a vinyl, aluminum, or similarly formed exterior accessory with a profile resembling the letter “J.” One side includes a nailing flange used to attach the accessory to the wall, while the deeper receiving pocket accepts and conceals the cut edge of a siding or soffit panel.
Its primary purpose is to create an attractive termination where siding meets another component. J-channel is not structural support, and it should not be treated as a replacement for flashing, trim, a water-resistive barrier, or another required part of the exterior wall system.
J-channel is available in different widths, depths, profiles, materials, and colors. The correct accessory depends on the siding product being installed and the amount of space required to receive the panel without restricting its movement.
```Where Is J-Channel Commonly Installed?
```J-channel is used wherever siding or soffit must terminate against an opening, obstruction, adjoining material, or architectural feature. Its exact placement depends on the design of the home and the manufacturer’s approved installation details.
- Around windows and exterior doors.
- Along the upper edge of a siding wall.
- At siding-to-soffit transitions.
- Along angled rooflines and gable ends.
- Around vents, electrical boxes and utility penetrations.
- Where siding meets masonry, trim boards or another exterior material.
- Around decorative details and other exterior projections.
- In certain inside-corner applications when approved by the siding manufacturer.
Why J-Channel Selection Matters
```A common mistake is assuming that every siding profile can use the same J-channel. The receiving pocket must be deep enough to accommodate the thickness and projection of the panel while still providing the required space for expansion and contraction.
Standard vinyl siding often uses a shallower channel than insulated vinyl siding. Products with foam backing, thicker profiles, contoured shapes, or specialized locking systems may require deeper or product-specific accessories.
A channel that is too shallow can compress the panel or prevent it from moving freely. A channel that is unnecessarily deep may leave the panel looking loose, recessed, or unfinished. The exact accessory should therefore be verified through the siding manufacturer’s specifications rather than selected by appearance alone.
```Before Selecting J-Channel, Confirm:
```- The siding manufacturer and exact product line.
- The panel thickness and projection.
- The required receiving-pocket depth.
- Whether the channel is approved for horizontal siding, vertical siding, soffit or insulated siding.
- The manufacturer’s required expansion clearance.
- The approved fastener type and fastening schedule.
- The correct overlap, notch or miter procedure.
- Compatibility with the siding color and finish.
- Any enhanced fastening requirements for high-wind applications.
J-Channel and VSI Installation Guidance
```The Vinyl Siding Institute installation resources, now maintained by the Polymeric Exterior Products Association, include J-channel as one of the key accessories installed before the surrounding vinyl siding panels.
VSI guidance explains how J-channel can be fitted around windows and other openings so the surrounding siding has a properly prepared receiving area. These details include cutting, notching and folding portions of the upper channel to help guide incidental water toward the side channels and exterior drainage plane.
The VSI installation manual states that its instructions are based in part on ASTM D4756 and recommends reviewing local building codes and current manufacturer literature for variations that may apply to a particular product or geographic area.
General industry guidance is valuable, but it should always be used together with the instructions supplied by the manufacturer of the exact siding system being installed.
```How ASTM Standards Relate to J-Channel
```ASTM standards create recognized benchmarks for vinyl siding materials, testing, and installation practices. They do not replace the installer’s responsibility to follow product-specific instructions, but they provide an important technical foundation for the industry.
ASTM D4756
ASTM D4756 addresses minimum requirements and installation methods for rigid PVC siding, soffit, and related accessories. Its scope includes installation practices intended to support effectiveness and durability in service, while also directing users to the specific manufacturer’s instructions.
ASTM D3679
ASTM D3679 establishes material and performance requirements for rigid PVC siding. Its testing provisions address characteristics such as dimensions, expansion, shrinkage, impact resistance, appearance, and wind-load resistance.
ASTM D5206
ASTM D5206 describes methods for testing the wind-load resistance of rigid plastic siding. The standard connects tested performance to siding installed according to the appropriate installation practice, product standard, or manufacturer instructions. This reinforces why panels, fasteners, J-channel, starter strip, corner posts, and other accessories must be treated as parts of one coordinated system.
```Vinyl Siding Must Be Allowed to Move
```Vinyl siding expands and contracts as temperatures change. J-channel must conceal the panel ends without holding them so tightly that this natural movement is restricted.
When a siding panel is cut too tightly between two receiving channels, warm-weather expansion can cause it to bow, buckle, ripple, or distort. When it is cut too short, the panel may pull out of the channel during colder weather and expose the cut edge.
Required clearance can depend on panel length, installation temperature, siding design, and manufacturer instructions. Installers should not assume that one measurement applies to every siding line or every weather condition.
J-channel must also be fastened correctly. Fasteners driven too tightly against the nailing flange may restrict movement or distort the accessory. The approved fastener type, spacing, penetration, and placement should always be confirmed before installation.
```Manufacturer Specifications Take Priority
```Manufacturers design siding panels and accessories to function together. Their installation manuals may specify the required J-channel depth, accessory profile, fastener type, fastening spacing, expansion clearance, flashing sequence, and approved use around different parts of the building.
Product-specific requirements are especially important with insulated siding. For example, Alside’s installation instructions for Prodigy insulated siding identify a deeper 1½-inch J-channel for receiving the thicker siding around windows, doors, and other openings.
That detail should not be applied automatically to another siding product. A traditional vinyl siding profile, specialty panel, composite cladding, or another insulated system may require a different accessory.
Contractors should use current instructions for the exact product on the project. Installation practices remembered from an older product line may no longer match the accessory, warranty, or performance requirements of a newer system.
```J-Channel Is Not Flashing
```J-channel creates a finished siding termination, but it is not designed to replace window flashing, door flashing, step flashing, kick-out flashing, head flashing, or the home’s water-resistive barrier.
Windows and doors must first be properly integrated with the wall’s drainage plane. The J-channel is then installed as part of the exterior cladding system. When these components are placed in the correct sequence, incidental water can be directed toward the exterior instead of becoming trapped behind the siding.
Sealant should not be applied indiscriminately to every J-channel joint or opening. Blocking an intended drainage path can trap water. Sealants should be used only where required by the applicable installation detail or manufacturer.
```J-Channel Around Windows and Doors
```Openings are among the most detail-sensitive areas of an exterior wall. J-channel around a window or door must be measured carefully, installed square, and coordinated with the flashing system.
Industry installation guidance commonly calls for the top channel to be cut and formed so portions extend over or into the side channels. This arrangement helps direct water away from the upper corners rather than allowing it to move behind the surrounding siding.
The finished opening should also provide enough receiving depth for the cut siding panels. If a replacement window projects farther from the wall than the original unit, custom aluminum trim, extension details, or a different accessory configuration may be required.
Older homes in Bettendorf and the Quad Cities may have replacement windows installed over several generations. Existing trim and flashing conditions should be evaluated rather than assuming every opening can be finished with the same J-channel detail.
```Using J-Channel Along Rooflines
```Angled rooflines and roof-to-wall intersections require careful accessory placement. J-channel may receive the angled cuts of siding panels, but it must remain separate from the roofing and flashing components responsible for managing roof runoff.
Proper step flashing and kick-out flashing should be installed before the siding termination is completed. The siding and J-channel should also maintain the clearances required by the roofing and siding manufacturers.
These areas deserve extra attention because a roof can direct a concentrated amount of water toward the lower end of a wall intersection. A neatly installed J-channel cannot compensate for missing or incorrectly installed flashing.
```Finishing the Top Course of Siding
```J-channel is sometimes installed at the top of a wall, but the final siding panel may require another finishing accessory to hold it securely.
Depending on the product, the installer may need utility trim, undersill trim, dual utility trim, or another manufacturer-approved component. The upper edge of the siding panel may be trimmed and formed with raised tabs using a snap-lock punch so it can engage the finishing trim.
Simply placing a loose cut edge inside J-channel may not provide the positive engagement required by the manufacturer. The approved finishing method should be used to prevent the final course from becoming loose or disengaging in strong winds.
```Common J-Channel Installation Mistakes
```- Using the wrong channel depth: A shallow channel may compress a thick siding panel, while an oversized channel may create an uneven or unfinished appearance.
- Cutting panels too tightly: Insufficient room for expansion can cause buckling or distortion.
- Cutting panels too short: The panel may contract out of the receiving pocket and expose the cut edge.
- Driving fasteners too tightly: Pinning the accessory against the wall can restrict normal movement.
- Using J-channel in place of flashing: The channel finishes the siding edge but does not waterproof an opening or roof intersection.
- Creating improper corner overlaps: Poorly cut corners may look unfinished and interfere with drainage.
- Blocking drainage with sealant: Unnecessary caulking can trap water inside the channel.
- Mixing incompatible accessories: A standard J-channel may not accommodate insulated or specialty siding.
- Ignoring installation temperature: Expansion clearance may need to account for the temperature when the siding is installed.
- Skipping manufacturer instructions: General practices do not replace the specifications for the exact product.
Why These Details Matter in Bettendorf, Iowa
```Bettendorf and the greater Quad Cities area experience hot summer temperatures, cold winters, strong winds, rain, snow, ice, and repeated freeze-and-thaw cycles. These seasonal changes place additional importance on siding movement, fastening, flashing, and drainage.
Siding installed during colder weather must still have room to expand when summer temperatures arrive. Likewise, panels installed on a hot day need enough receiving depth to remain concealed when they contract during winter.
Wind-driven rain makes proper detailing around windows, doors, gables, and rooflines especially important. The J-channel, flashing, water-resistive barrier, mounting blocks, and siding panels must work together instead of being treated as unrelated pieces.
Local homes may also include older wall assemblies, replacement windows, multiple siding layers, uneven sheathing, custom trim, and previous repairs. Those existing conditions should be evaluated before new siding accessories are installed.
``````“J-channel may look like a simple trim accessory, but the details matter. The channel has to match the siding profile, allow the panels to move, work with the flashing system, and create a clean finished transition. Taking the time to select and install the correct accessory can make a significant difference in both the appearance and long-term performance of the exterior.”
```
J-Channel Is One Part of a Complete Siding System
```A professional siding installation involves much more than the visible wall panels. J-channel, starter strip, corner posts, utility trim, soffit accessories, mounting blocks, flashing, fasteners, and the water-resistive barrier must all be compatible and installed in the correct sequence.
Planning accessory requirements before the project begins can reduce delays and prevent installers from substituting a profile that does not properly fit the selected siding.
The best results come from combining established industry guidance with current manufacturer specifications, applicable building codes, proper jobsite evaluation, and experienced installation practices.
```Talk with the Siding Specialists at Suburban Wholesale & Supply
```Suburban Wholesale & Supply serves contractors, builders, remodelers, property owners, and homeowners throughout Bettendorf, Iowa, Davenport, LeClaire, Eldridge, Moline, Rock Island, and the greater Quad Cities area.
Our experienced team can help identify compatible J-channel, starter strip, utility trim, corner posts, mounting blocks, fasteners, water-resistive barriers, soffit products, and siding accessories for your next exterior project.
Before installation begins, always review the current instructions for the exact siding and accessory system being used. Applicable building codes, approved project documents, and manufacturer warranty requirements should also be confirmed.
```Standards and Technical References
```- Polymeric Exterior Products Association and the Vinyl Siding Institute, Vinyl Siding Installation Manual.
- Polymeric Exterior Products Association, Prepare Windows and Install Siding Accessories.
- ASTM International, ASTM D4756, Standard Practice for Installation of Rigid Poly(Vinyl Chloride) PVC Siding and Soffit.
- ASTM International, ASTM D3679, Standard Specification for Rigid Poly(Vinyl Chloride) PVC Siding.
- ASTM International, ASTM D5206, Standard Test Method for Windload Resistance of Rigid Plastic Siding.
- Alside, Prodigy Next-Generation Insulated Siding Installation Instructions.
- Current installation instructions, accessory specifications, technical data, and warranty requirements published by the manufacturer of the selected siding system.
Technical note: J-channel requirements vary according to the siding profile, accessory design, installation temperature, opening configuration, wall assembly, local building requirements, and manufacturer specifications. This article provides general educational information and does not replace current manufacturer instructions, approved construction documents, or applicable building codes.
```Contractor Notes
We‘re here to help.
Suburban Wholesale & Supply works with contractors, remodelers, builders, and property professionals across Davenport, Bettendorf, Moline, Rock Island, and the wider Quad Cities. If Understanding Vinyl Siding J-Channel | Bettendorf, Iowa affects a project you are pricing, our team can help compare product lines, confirm available options, and prepare a quote that fits the opening, exterior, or jobsite requirements.
Our counter and showroom teams support window, patio door, entry door, storm door, siding, trim coil, gutter protection, and accessory orders every week. We can talk through manufacturer differences, color and finish selections, installation details, lead times, and documentation so you can give your customer clear answers before the work begins.
For current availability, contractor pricing, product literature, or help matching this topic to a real project, contact Suburban Wholesale & Supply or send the details through our quote form. We will help you move from product research to an accurate material order with fewer surprises.
Share This Post
Share it on Facebook or X, or send it through your device share sheet for Instagram.