Utility trim and finish trim help secure cut vinyl siding panels beneath windows and at the top of exterior walls. Learn how these accessories differ and why proper selection, snap-lock tabs, build-out, VSI guidance, ASTM standards, and manufacturer specifications matter on Bettendorf and Quad Cities siding projects.
Professional Vinyl Siding Installation Guidance
```Utility Trim vs. Finish Trim: Understanding the Difference
Utility trim and finish trim are small siding accessories with an important job. They help secure cut vinyl siding panels at the top of a wall, beneath windows, along horizontal projections, and in other areas where the panel’s original locking edge has been removed.
```The terminology can sometimes be confusing because contractors, distributors, and manufacturers may use names such as utility trim, undersill trim, finish trim, dual utility trim, or double utility trim for products that perform similar—but not always identical—functions.
```For homeowners and contractors in Bettendorf, Iowa, and throughout the Quad Cities, understanding these accessories can help prevent loose top courses, uneven siding, visible cut edges, and trim combinations that do not properly match the selected siding system.
```What Is Utility Trim?
```Utility trim is a narrow receiving accessory used to secure the cut edge of a vinyl siding panel. It is commonly installed under window sills, beneath soffits, at the top of a siding wall, and anywhere the panel’s factory locking mechanism has been removed during cutting.
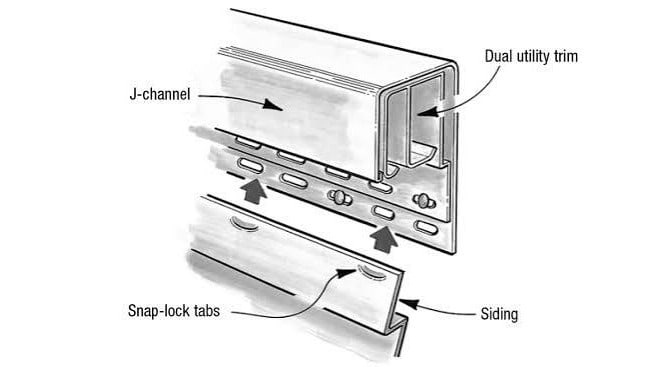
The cut edge of the siding is typically formed with raised tabs using a snap-lock punch. Those tabs engage the utility trim and help hold the panel securely without face-nailing through the visible surface.
Utility trim may also be called undersill trim because one of its most familiar applications is directly beneath a window sill. However, it can be used in several other finishing locations when permitted by the siding manufacturer.
```What Is Finish Trim?
```Finish trim is a broader descriptive term for an accessory used to complete and secure the final cut edge of siding. Depending on the manufacturer, a product labeled “finish trim” may function much like traditional utility trim, or it may have a profile designed for a specific siding system.
Some finish trims include a deeper receiving pocket, multiple engagement points, a more decorative face, or a profile intended to work with thicker siding. Others are designed to be used together with J-channel, lineals, or manufacturer-specific trim assemblies.
Because “finish trim” is not always a universal product name, the accessory should be identified by its manufacturer part number and approved application—not by terminology alone.
```Utility Trim vs. Finish Trim at a Glance
```| Feature | Utility Trim | Finish Trim |
|---|---|---|
| Primary purpose | Secures a cut siding edge after the factory lock has been removed. | Completes a siding termination using a product-specific finishing profile. |
| Common locations | Beneath windows, under soffits, and at the top of a siding wall. | Top courses, window and door transitions, lineal systems, and specialty siding terminations. |
| Panel preparation | Frequently requires snap-lock tabs to be punched into the cut panel edge. | Depends on the manufacturer and may use tabs, locking profiles, inserts, or another approved method. |
| Product depth | Commonly designed for standard vinyl siding profiles. | May be standard, deep-pocket, decorative, or system-specific. |
| Terminology | Often also called undersill trim. | May be used as a general category or a manufacturer’s specific product name. |
Why the Final Course Needs a Finishing Accessory
```A standard horizontal siding panel is designed to lock into the panel below it while its upper nailing hem is fastened to the wall. At the top of a wall or beneath a window, the panel often has to be cut lengthwise to fit the remaining space.
That cut may remove the factory nailing hem and part of the original locking system. Without an approved finishing accessory, the remaining panel edge may not have a reliable way to stay engaged.
Utility trim or another manufacturer-approved finish trim gives the cut panel an attachment point while helping conceal the unfinished edge.
```How Snap-Lock Tabs Work
```A snap-lock punch is used to form a series of raised tabs along the cut edge of a vinyl siding panel. The tabs are normally oriented so they engage the receiving lip of the utility trim after the panel is pushed into position.
The tabs should be spaced and oriented according to the siding manufacturer’s instructions. If they are punched in the wrong direction, positioned too far from the edge, or spaced too widely, they may not hold the panel securely.
This method allows the top course to remain mechanically engaged without driving fasteners through the visible face of the siding.
```Before Selecting Utility or Finish Trim, Confirm:
```- The siding manufacturer and exact product line.
- The panel thickness, projection, and locking design.
- The manufacturer’s approved finishing accessory.
- Whether standard, double, or deep-pocket utility trim is required.
- Whether the accessory will be installed alone or inside J-channel.
- Whether the cut panel must be built out with shims or furring.
- The correct snap-lock punch and tab orientation.
- The required expansion clearance at adjoining stops.
- The approved fastener type, spacing, and penetration.
- Any special requirements for insulated, vertical, or specialty siding.
Utility Trim and VSI Installation Guidance
```The Vinyl Siding Institute installation manual, maintained by the Polymeric Exterior Products Association, identifies utility trim and double utility trim among the standard accessories used to create a finished vinyl siding installation.[1]
VSI guidance explains that a snap-lock punch can be used to create raised tabs in a cut siding edge when finishing the top of a wall or installing siding beneath a window. The formed edge is then secured into utility trim or another approved receiving accessory.[1]
The manual also explains that utility trim may be used to secure a cut panel edge in special conditions where the lower portion of the panel has been removed. In those applications, the area may need to be properly built out so the siding maintains its intended angle and rigidity.[1]
VSI guidance provides an industry foundation, but the manual also directs installers to consult current manufacturer instructions and applicable building requirements for product-specific variations.
```How ASTM Standards Apply
```ASTM standards establish recognized installation practices and performance requirements for rigid vinyl siding systems. Utility trim and finish trim are part of the broader accessory and trim-channel category covered by these practices.
ASTM D4756
ASTM D4756 addresses the installation of rigid PVC siding, soffit, accessories, trim channels, and fasteners. Its scope covers wall preparation, horizontal and vertical siding, soffit and fascia, and special installation details. The standard also directs installers to follow the specific manufacturer’s installation instructions and applicable building codes.[2]
ASTM D3679
ASTM D3679 establishes material and performance requirements for rigid PVC siding. Although it is primarily a product-performance standard, its requirements reinforce the importance of using compatible accessories and installation practices that allow the siding system to perform as intended.
ASTM D5206
ASTM D5206 addresses wind-load testing for rigid plastic siding. A secure top course is important because a panel that is not properly engaged at its cut edge may be more vulnerable to movement or disengagement. The tested siding assembly and the manufacturer’s installation method should be treated as a coordinated system.
```Manufacturer Specifications Take Priority
```Manufacturers may use different names for accessories that appear similar. One product catalog may identify “utility trim,” another may use “undersill trim,” and another may specify a proprietary finish trim for a particular siding line.
Differences may include the depth of the receiving pocket, the position of the internal locking lip, the width of the face, the number of engagement points, and compatibility with thicker panels.
Insulated siding is a good example of why product-specific instructions matter. Alside’s Prodigy installation instructions recommend specially designed wide-pocket accessories because the insulated panel has a greater overall projection than standard vinyl siding. The instructions also explain that standard accessories may require additional build-out and panel preparation when used with that system.[3]
Never assume that a standard utility trim will properly secure insulated siding, vertical siding, shakes, board-and-batten, composite cladding, or another specialty product.
```What Is Double Utility Trim?
```Double utility trim, sometimes called dual utility trim, includes more than one receiving or locking position. This allows it to accommodate different panel cuts, projections, or wall conditions.
It can be helpful when the exact cut line causes the panel to sit at a different depth than a standard utility trim can comfortably receive. It may also provide flexibility when finishing beneath windows with varying sill projections.
Double utility trim is not automatically better for every application. It should be used when specified or approved for the selected siding system and termination detail.
```Utility Trim Beneath Windows
```Beneath a window, the siding panel is commonly cut to fit between the course below and the underside of the sill. The cut removes the panel’s upper nailing hem, leaving an edge that must be supported and secured.
Utility trim may be installed beneath the sill, often inside or in coordination with the surrounding J-channel. The installer then punches raised tabs in the cut edge and locks the panel into the trim.
If the cut panel sits too far behind the face of the wall, the trim may need to be built out so the panel remains at the proper angle. Without adequate support, the siding can appear recessed, wavy, or loose.
Window flashing and the water-resistive barrier must already be properly integrated behind the siding. Utility trim and J-channel are finishing accessories, not substitutes for flashing.
```Finishing the Top of a Siding Wall
```At the top of a horizontal siding wall, the remaining space rarely matches the full height of a siding panel. The final panel is therefore measured and cut lengthwise.
Utility trim or the manufacturer’s designated finish trim is installed beneath the soffit, frieze board, J-channel, or other upper termination. Raised tabs are then formed in the panel so its cut edge can engage the trim.
The panel should fit securely without being forced. It must also retain the expansion clearance required at inside corners, outside corners, J-channel, and other stops.
Face-nailing through the visible surface should not be used as a shortcut when a mechanical finishing method is available and required by the manufacturer.
```Utility Trim Inside J-Channel
```In some installations, utility trim is placed inside J-channel. The J-channel conceals the panel edge and creates the finished perimeter, while the utility trim provides the locking point needed to hold the cut panel.
This combination is often used beneath windows and at upper wall terminations. However, the combined depth must match the panel profile and surrounding trim condition.
If the utility trim is installed too far back, the siding may be pulled inward. If it is built out too far, the panel may bow outward or fail to seat properly in the J-channel.
```Why Proper Build-Out Matters
```Vinyl siding is designed to hang at a specific angle determined by the profile of the panel and the lock of the course below. When a panel is cut near the top or bottom, its natural support may be reduced.
Furring, shims, or another manufacturer-approved build-out may be needed behind the utility trim so the cut panel remains on the same plane as the full siding courses.
Proper build-out improves rigidity, helps maintain consistent shadow lines, and reduces the likelihood of a visibly sunken or loose panel.
```Vinyl Siding Still Needs Room to Move
```Securing a cut edge does not eliminate the need for expansion and contraction. Vinyl siding changes length as temperatures rise and fall.
The VSI installation manual calls for clearance at openings and stops and increases the recommended minimum clearance when siding is installed in temperatures below 40 degrees Fahrenheit. It also advises against driving fasteners tightly or caulking siding panels where they enter receiving channels.[1]
The exact clearance and fastening requirements should be verified through the current instructions for the siding product being installed.
```Common Utility and Finish Trim Mistakes
```- Treating every finish trim as interchangeable: Similar-looking accessories may have different receiving depths and locking positions.
- Using the wrong trim for the siding profile: Standard utility trim may not properly receive insulated or specialty siding.
- Skipping the snap-lock tabs: A smooth cut edge may not remain securely engaged in traditional utility trim.
- Punching tabs in the wrong direction: Incorrectly oriented tabs may not catch the trim’s locking lip.
- Spacing tabs too far apart: Inadequate engagement can leave sections of the panel loose.
- Failing to build out the trim: A recessed accessory may pull the siding inward and create a visible dip.
- Forcing the panel into the receiver: A tight fit can distort the siding or restrict movement.
- Face-nailing the final course: Fastening through the visible surface can restrict movement and create ripples.
- Using trim as flashing: Utility trim and finish trim secure siding edges but do not replace window, door, or wall flashing.
- Ignoring manufacturer specifications: Product-specific instructions determine which accessory and installation method are approved.
Why These Details Matter in Bettendorf, Iowa
```Bettendorf and the surrounding Quad Cities experience hot summers, cold winters, strong winds, snow, ice, rain, and repeated freeze-and-thaw cycles. Those temperature changes make proper siding movement especially important.
A top course that is secured too tightly during winter installation may buckle when summer heat causes the panel to expand. A loosely finished panel may become more noticeable during strong winds or as cold temperatures cause contraction.
Bettendorf-area homes may also include replacement windows, additions, enclosed porches, custom soffits, brick transitions, older sheathing, and several generations of exterior remodeling. These conditions can affect the depth and position of the finishing accessory.
Each termination should be measured and evaluated rather than assuming that one trim profile will work throughout the entire project.
``````“Utility trim and finish trim may look like minor accessories, but they are what help hold a cut siding panel where the factory lock has been removed. The right trim, proper build-out, and correctly formed snap-lock tabs create a cleaner finish and help the siding perform the way the manufacturer intended.”
```
Utility Trim and Finish Trim Are Part of a Complete System
```Professional siding installation depends on compatible wall panels, corner posts, starter strip, J-channel, utility trim, finish trim, mounting blocks, soffit accessories, fasteners, flashing, and water-resistive barriers.
Accessories should be planned before installation begins. Confirming the proper finishing trim in advance can help prevent jobsite substitutions and improvised fastening methods.
The best results come from combining VSI installation guidance, applicable ASTM standards, manufacturer specifications, local building requirements, and experienced installation practices.
```Talk with the Siding Specialists at Suburban Wholesale & Supply
```Suburban Wholesale & Supply serves contractors, builders, remodelers, property owners, and homeowners throughout Bettendorf, Davenport, LeClaire, Eldridge, Moline, Rock Island, and the greater Quad Cities area.
Our experienced team can help identify compatible utility trim, double utility trim, finish trim, J-channel, starter strip, corner posts, mounting blocks, soffit products, fasteners, water-resistive barriers, and siding accessories for your next exterior project.
Always review the current instructions for the exact siding and accessory system before installation. Applicable building codes, approved project documents, and manufacturer warranty requirements should also be confirmed.
```Standards and Technical References
```- Polymeric Exterior Products Association and the Vinyl Siding Institute, Vinyl Siding Installation Manual.
- ASTM International, ASTM D4756, Standard Practice for Installation of Rigid Poly(Vinyl Chloride) PVC Siding and Soffit.
- ASTM International, ASTM D3679, Standard Specification for Rigid Poly(Vinyl Chloride) PVC Siding.
- ASTM International, ASTM D5206, Standard Test Method for Windload Resistance of Rigid Plastic Siding.
- Alside, Prodigy Next-Generation Insulated Siding Installation Instructions.
- Current installation instructions, accessory catalogs, technical data, and warranty requirements published by the manufacturer of the selected siding system.
Technical note: The terms utility trim, undersill trim, finish trim, dual utility trim, and double utility trim may be defined differently by individual manufacturers. Accessory selection and installation requirements vary according to panel design, siding thickness, wall configuration, installation temperature, and manufacturer specifications. This article provides general educational information and does not replace current manufacturer instructions, approved construction documents, or applicable building codes.
```Contractor Notes
We‘re here to help.
Suburban Wholesale & Supply works with contractors, remodelers, builders, and property professionals across Davenport, Bettendorf, Moline, Rock Island, and the wider Quad Cities. If Utility Trim vs. Finish Trim | Bettendorf, Iowa Siding affects a project you are pricing, our team can help compare product lines, confirm available options, and prepare a quote that fits the opening, exterior, or jobsite requirements.
Our counter and showroom teams support window, patio door, entry door, storm door, siding, trim coil, gutter protection, and accessory orders every week. We can talk through manufacturer differences, color and finish selections, installation details, lead times, and documentation so you can give your customer clear answers before the work begins.
For current availability, contractor pricing, product literature, or help matching this topic to a real project, contact Suburban Wholesale & Supply or send the details through our quote form. We will help you move from product research to an accurate material order with fewer surprises.
Share This Post
Share it on Facebook or X, or send it through your device share sheet for Instagram.